If you have a problem, and no-one else can help, and if you can find them, maybe you can ask an HCL Ambassador…
![]()
See the HCL Ambassadors Class of 2021
If you have a problem, and no-one else can help, and if you can find them, maybe you can ask an HCL Ambassador…
![]()
See the HCL Ambassadors Class of 2021
Textbox.io for AngularJS allows developers to leverage the capabilities of the Textbox.io WYSIWYG Rich Text Editor in forms within your AngularJS application. This provides a far more feature rich content authoring environment than a standard textarea.
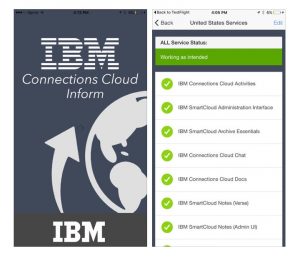
IBM Inform is a new mobile app for Connections Cloud customers. It provides dynamic updates about the current status of the Connections Cloud Services, providing schedule insight and important status updates during service impacting events. IBM Inform is a great complement to the other communication tools used to reach administrators and clients’ help desk.
One VM Server does not work today and the VMWare vSphere client was not an option form me today. Several restrictions including bad internet connection using my cellphone.
The solution was using ssh to VMWare host an then using the command line to power off and then power on the VM.
vim-cmd vmsvc/getallvms |grep <vm name>
Note: The first column of the output shows the vmid.
vim-cmd vmsvc/power.getstate <vmid>
vim-cmd vmsvc/power.on <vmid>
More information on this TN from VMWare
Today i upgrade one TDI 7.1.1 JVM to the latest fix from IBM.
The setup was easy, just unzip the file and copy to jvm directory.
When i launch an assembly line using delta. The log file show the following error:
CTGDKE039E Error occurred when creating IBM Tivoli Directory Integrator Property store. Property store: System-Properties Exception: java.sql.SQLNonTransientConnectionException: java.net.ConnectException : Error connecting to server localhost on port 1527 with message Connection refused: connect.
The derby database was not starting, and in derby.log i found:
2016-07-06 20:44:01.917 GMT : Access denied (java.net.SocketPermission localhost:1527 listen,resolve)
java.security.AccessControlException: Access denied (java.net.SocketPermission localhost:1527 listen,resolve)
I try everything on http://www-01.ibm.com/support/docview.wss?uid=swg21450475
The problem was related to permission. The text bellow is from https://db.apache.org/derby/releases/release-10.10.2.0.html
After upgrading to a JVM with these changes, while attempting to boot, the network server may fail and raise the following error:
To workaround this problem, you must bring up the network server with a security policy which includes the now required missing permission. Instead of booting the network server as:
boot the network server as follows:
where ${yourPolicyFile} is a file containing a customized version of the policy file described in the Derby Admin Guide section titled Basic Network Server security policy. You must customize that generic policy file to fit your application. In addition, you must add the following permission to the permissions block granted to the ${derby.install.url}derbynet.jar codebase:
where ${port} should be replaced by the port number where the network server listens for incoming connection requests. By default, that is port 1527.
Solving the problem
I add permission java.net.SocketPermission “localhost:1024-“, “listen”; to the grant session of the java.policy file and restart TDI
Obs: Go to this link for a smarter way to download the presentations 🙂
Several sessions has the presentation file for download.
I created a file above with links to presentations files i found (51 files). I will update it next week.
To download all files do the steps bellow.
1 – Install DownThemAll! add-on for Firefox. After installing restart Firefox.
2 – Login on the connect2016 site. Go to Firefox menu and select Tools – DownThemAll! Tools – Manager… Right-click inside DownThemAll! screen.
3 – Select context menu Advanced – Import from file.
4 – On Import downloads dialog window make sure you select Text Files in the dropdown list.
5 – Point to the text file connect2016 that contains the URLs. Click Open button.
6 – On Make your selection dialog window, DownThemAll! will load each link it finds in the text file allowing you to select which ones you want to download and the folder where you want the files to be saved as well.
7 – Make your selections, click Start button.
On my connections test server i installed everything in one machine.
The home directory for db2inst1 user ends the file space
The databases and all containers are under the default of /home/db2inst1. So we can use db2relocatedb to move them.
First i tested this here with the sample database, and it worked. Your configuration file should look like the following (This is for FILES DB, you will have to change at least the DB_NAME for the others):
DB_NAME=Files
DB_PATH=/home/db2inst1,/dados
INSTANCE=db2inst1
STORAGE_PATH=/home/db2inst1,/dados/db2inst1
/* NOTE that I am assuming that all databases are using the default storage path like the FILES DB is. If not, you will need to modify this. You can verify by running for each database:
db2 “SELECT VARCHAR(STORAGE_GROUP_NAME, 30) AS STOGROUP, VARCHAR(DB_STORAGE_PATH, 40) AS STORAGE_PATH FROM TABLE(ADMIN_GET_STORAGE_PATHS(”,-1)) AS T”
So if the output shows /home/db2inst1, then you can use my example above. Otherwise you will need to use the actual value for te original location. */
LOG_DIR=oldDirPath,newDirPath
/* For the log directory, with the FILES DB, you are suing the default of /home/db2inst1/etc etc, so you do not need to set this. If the others are the same, then you do not need to set them either. Otherwise you have to.
FAILARCHIVE_PATH=newDirPath
LOGARCHMETH1=newDirPath
LOGARCHMETH2=newDirPath
MIRRORLOG_PATH=newDirPath
OVERFLOWLOG_PATH=newDirPath
/* For the above, for the FILES database, you are not using any of them so you can ignore these. For the other databases, if you are not using them OR you are using the default of /home/db2inst1, then you can ignore them.
So ultimately for the FILES database, you would have:
DB_NAME=Files
DB_PATH=/home/db2inst1,/dados
INSTANCE=db2inst1
STORAGE_PATH=/home/db2inst1,/dados/db2inst1
If the other databases are just like files (regarding storage path and log directory), then you will have the same thing except for the database name.
Then perform the following steps:
1. Stop the Connections server and terminate all connections and deactivate the databases – “db2 deactivate db <dbname>”.
2. Stop the instance – “db2stop”.
3. MOVE (do NOT copy!!) the database directory to the new location (VERY IMPORTANT TO MAKE SURE INSTANCE IS STOPPED!!):
mv /home/db2inst1/db2inst1 /dados
Once done you should have /dados/db2inst1/<all the database stuff>. Since all databases are under this directory, you only need to execute the one move command.
4. Ensure that the owner/group/permissions for /dados/db2inst1 are correct (should match old location).
5. Then you would execute the db2relocatedb command FOR EACH database. DO NOT START THE INSTANCE UNTIL ALL ARE DONE!!.
db2relocatedb -f <config file name>
You should see the following output:
[db2inst1@connections ~]$ /home/db2inst1/sqllib/bin/db2relocatedb -f blogs.cfg
Files and control structures were changed successfully.
Database was catalogued successfully.
6. Once the above has been done for each database, you should be able to start the instance and then connect to the databases.
Thanks to IBM IM Support.
In this post i will describe the steps i follow to backup my IBM Connections 5.0. The TSM Server and Connections Serve are using Linux.
Install TSM Client on the IBM Connections Server.
Install gskcrypt and gskssl. Normally, these libraries can be found in an archive with the TSM Client.
#rpm -ivh gskcrypt64-8.0.x.x.linux.x86_64.rpm
#rpm -ivh gskssl64-8.0.x.x.linux.x86_64.rpm
# yum localinstall TIVsm-API64.x86_64.rpm
# yum localinstall TIVsm-BA.x86_64.rpm
TSM Client Configuration.
Add the TSM client service to autostart :
# chkconfig --add dsmcad
# chkconfig dsmcad on
Create the configuration files dsm.sys and dsm.opt.
Copy the files from samples /opt/tivoli/tsm/client/ba/bin/
# cp dsm.opt.smp dsm.opt
# cp dsm.sys.smp dsm.sys
I create some Exclude rules to not backup log files and temporary folders.
All other files of the Connections will be included on the baackup.
The content of my dsm.sys :
Obs: Server name and ip address must match your environment
SErvername <your tsm server name>
COMMMethod TCPip
TCPPort 1500
Exclude /.../*.log
Exclude /.../log/.../*
Exclude /.../tmp/.../*
Exclude /.../wstemp/.../*
Exclude /.../javacore*
Exclude /.../logs/.../*
SCHEDLOGRETENTION 7 D
MAXCMDRETRIES 4
COMPRESSION YES
MANAGEDSERVICES WEBCLIENT SCHEDULE
QUERYSCHEDPERIOD 1
COMMMethod TCPip
TCPPort 1500
TCPServeraddress <your tsm server ip address>
PASSWORDACCESS GENERATE
NODename Connections
Content of dsm.opt:
SErvername <your tsm server name>
TSM Policy Domain
Tivoli Storage Manager Policy Management are the important set of rules or instructions to TSM server & database for managing client backups in the server storage. Policies are rules that you set at the IBM Tivoli Storage Manager server to help you manage client data. Policies control how and when client data is stored, how long to be stored and when to expire.
For example:
How and when files are backed up and archived to server storage
How space-managed files are migrated to server storage
The number of copies of a file and the length of time copies are kept in server storage
I created a FILEDOMAIN policy for filesystem backup on my TSM Server with the following commands on TSM console:
define domain FILESDOMAIN
define policyset FILESDOMAIN FILESPOLICY
define mgmtclass FILESDOMAIN FILESPOLICY FILESMGMTCLASS
assign defmgmtclass FILESDOMAIN FILESPOLICY FILESMGMTCLASS
define copygroup FILESDOMAIN FILESPOLICY FILESMGMTCLASS type=backup dest=backuppool VEREXISTS=5 VERDEL=1 RETEXTRA=3 RETONLY=5
define copygroup FILESDOMAIN FILESPOLICY FILESMGMTCLASS type=archive dest=archivepool RETVER=8
validate policyset FILESDOMAIN FILESPOLICY
activate policyset FILESDOMAIN FILESPOLICY
File retention is key for this configuration. See more information about this topic at: https://www-304.ibm.com/support/docview.wss?uid=swg21224145
Register the TSM Client
Perform the following steps in the TSM Server’s console, if you haven’t registered the new node yet.
register node CONNECTIONS <password> domain=FILESDOMAIN
Create a client schedule and associate the node
define schedule FILESDOMAIN WEEKDAY_INCREMENTAL action=Incremental options=-subdir=yes objects='"/opt/ibm/*" "/var/ibm/InstallationManager/*"' DAYofweek=WEEKDay startdate=today starttime=02:30 DURation=3 DURUnits=Minutes
Associate the client with the scheduler
define assoc FILESDOMAIN WEEKDAY_INCREMENTAL CONNECTIONS
# dsmc query sessionThe output will be like this
IBM Tivoli Storage Manager
Command Line Backup-Archive Client Interface
Client Version 7, Release 1, Level 2.0
Client date/time: 01/11/2016 11:07:26
(c) Copyright by IBM Corporation and other(s) 1990, 2015. All Rights Reserved.Node Name: CONNECTIONS
Session established with server IMPLET: Linux/x86_64
Server Version 7, Release 1, Level 1.100
Server date/time: 01/11/2016 11:09:15 Last access: 01/11/2016 10:27:50TSM Server Connection InformationHome Server Name........: <tsm server name>
Server Type.............: Linux/x86_64
Archive Retain Protect..: "No"
Server Version..........: Ver. 7, Rel. 1, Lev. 1.100
Last Access Date........: 01/11/2016 10:27:50
Delete Backup Files.....: "Yes"
Delete Archive Files....: "Yes"
Deduplication...........: "Server Only"Node Name...............: CONNECTIONS
User Name...............: root# dsmc query schedIBM Tivoli Storage Manager
Command Line Backup-Archive Client Interface
Client Version 7, Release 1, Level 2.0
Client date/time: 01/11/2016 11:39:13
(c) Copyright by IBM Corporation and other(s) 1990, 2015. All Rights Reserved.Node Name: CONNECTIONS
Session established with server <tsm server name>: Linux/x86_64
Server Version 7, Release 1, Level 1.100
Server date/time: 01/11/2016 11:41:03 Last access: 01/11/2016 11:27:52 Schedule Name: WEEKDAY_INCREMENTAL
Description:
Schedule Style: Classic
Action: Incremental
Options: -subdir=yes
Objects: "/opt/ibm/*" "/var/ibm/InstallationManager/*"
Priority: 5
Next Execution: 14 Hours and 49 Minutes
Duration: 3 Minutes
Period: 1 Day
Day of Week: Weekday
Month:
Day of Month:
Week of Month:
Expire: Never
Configure TSM to backup DB2
The Tivoli Storage Manager application programming interface (API) provides a library of functions that allow independent software applications and custom-built applications to back up and archive their data to a Tivoli Storage Manager server. The DB2 DBMS also uses the Tivoli Storage Manager API for backup and restore operations.DB2 provides its own backup utility that can be used to back up data at the table space level or the database level. If you set up this utility to use Tivoli Storage Manager as the backup media, DB2 communicates with the Tivoli Storage Manager API for backup and restore operations. Thus, both the Tivoli Storage Manager API client and backup-archive client work together to provide full data protection for your DB2 environment. The API client and the backup-archive client can run simultaneously on the same DB2 server. The Tivoli Storage Manager server considers them separate clients.
Setup TSM API on DB2 machine
Install gskcrypt and gskssland the TSM API
#rpm -ivh gskcrypt64-8.0.x.x.linux.x86_64.rpm
#rpm -ivh gskssl64-8.0.x.x.linux.x86_64.rpm
#yum localinstall TIVsm-API64.x86_64.rpm
Set the environment variablesSet the following DSMI environment variables in either the operating system shell or the
/home/instance_home_dir/sqllib/userprofile file.
DSMI_DIR
DSMI_CONFIG
DSMI_LOG
Important: The DB2 DBMS reads these environment variables during the DB2 instance startup. If you change the variables, you must restart the
DB2 instance for the changes to take effect.
DSMI_DIR
This variable points to the API installation directory. The dsmtca file, the dsm.sys file, and the language files must be in the directory pointed to by the DSMI_DIR environment variable. Setting the DSMI_DIR variable is optional. If it is not specified, the default directory is /usr/tivoli/tsm/client/api/bin64
DSMI_CONFIG
This variable points to the fully qualified path and file name of the Tivoli Storage Manager dsm.opt client options file. This file contains the name of the server to be used.
DSMI_LOG
This variable points to the directory path where the error log file, dsierror.log, is to be created.
export DSMI_CONFIG=/usr/tivoli/tsm/client/api/bin64/dsm.opt

export DSMI_LOG=/home/db2inst1

export DSMI_DIR=/usr/tivoli/tsm/client/api/bin64
Configure the dsm.sys and dsm.opt and put these files on /usr/tivoli/tsm/client/bin64 and change these files permissions to 775.
You can use the sample from step 3 just exclude the Exlude entries and change the node name.
Log off and log in again as an instance user and run the .profile file.
Restart the db2 instance.
Register a new Policy Domain for DB2
define domain dbdomain
define policyset dbdomain dbpolicy
define mgmtclass dbdomain dbpolicy dbmgmtclass
assign defmgmtclass dbdomain dbpolicy dbmgmtclass
define copygroup dbdomain dbpolicy dbmgmtclass type=backup dest=backuppool VEREXISTS=1 VERDEL=0 RETEXTRA=0 RETONLY=0 v
alidate policyset dbdomain dbpolicy
activate policyset dbdomain dbpolicy
Register the DB2 node
On the TSM Console register the new node:
register node ConnectionsDb2 <password> domain=DBDOMAIN
Set the API user
To access the Tivoli Storage Manager server, client users (called nodes) must have a password to access the server. The DB2 dsmapipw program uses the Tivoli Storage Manager API to create the encrypted password file. The DB2 application includes the dsmapipw utility, which is installed in the /home/instance_home_dir/sqllib/adsm directory.Log in as root user to run the dsmapipw utility. Before you run dsmapipw, you must set the DSMI environment variables similar to that on the DB2 instance.
# ./dsmapipw
Db2 online backup
On the TSM Server set the following to avoid errors. For detais see this TN http://www-01.ibm.com/support/docview.wss?uid=swg21686874
setopt BackupInitiationRoot no
Update the dabases configuration:
db2 update db cfg using LOGARCHMETH1 TSM (for all IBM Connections databases)
Schedule DB2 backup
Schedule the backup for DB2 databases are different from the filesystem. There are some paths to do the same thing.
I choose a script with cron.Create a file named backup.ksh with the following linesdb2 backup db fnos online use TSM
db2 backup db opnact online use TSM
db2 backup db cognos online use TSM
db2 backup db projexec online use TSM
db2 backup db metrics online use TSM
db2 backup db sncomm online use TSM
db2 backup db wikis online use TSM
db2 backup db forum online use TSM
db2 backup db fngcd online use TSM
db2 backup db homepage online use TSM
db2 backup db dogear online use TSM
db2 backup db peopledb online use TSM
db2 backup db mobile online use TSM
db2 backup db files online use TSM
db2 backup db blogs online use TSM
Add the following entry on the crontab of the root user using crontab -e
00 3 * * 1-6 su - db2inst1 -c "/home/db2inst1/backup.ksh >> /home/db2inst1/fullbackup.log 2>&1"
Managing old DB2 backups
Purge old DB2 backups is not managed by the TSM server.
The backups ara managed by the DB2. I use a new cron entry and a new scriptCreate a file called deldb2backup.ksh with the following lines:
db2adutl delete FULL older than 4 days db FILES
db2adutl delete FULL older than 4 days db OPNACT
db2adutl delete FULL older than 4 days db COGNOS
db2adutl delete FULL older than 4 days db PROJEXEC
db2adutl delete FULL older than 4 days db METRICS
db2adutl delete FULL older than 4 days db FNOS
db2adutl delete FULL older than 4 days db SNCOMM
db2adutl delete FULL older than 4 days db WIKIS
db2adutl delete FULL older than 4 days db FORUM
db2adutl delete FULL older than 4 days db FNGCD
db2adutl delete FULL older than 4 days db HOMEPAGE
db2adutl delete FULL older than 4 days db DOGEAR
db2adutl delete FULL older than 4 days db PEOPLEDB
db2adutl delete FULL older than 4 days db MOBILE
db2adutl delete FULL older than 4 days db BLOG
Add the following line to root crontab
00 14 * * 6 su - db2inst1 -c "/home/db2inst1/delbackup.ksh >> /home/db2inst1/delbackup.log 2>&1"
IBM released the first fix for IBM Connections 5.5
http://www-01.ibm.com/support/docview.wss?uid=swg21972646
Download the correct images for IBM Connections can be easy if you know what you need to download.
IBM published the download document with image numbers and description.